How to Change Windows 10 and 7 Default System Fonts

All our PC's come with a default font style, and many always want to modify their font style and feel the uniqueness and beauty of their PC. And many do it by changing their font style and font size.
Some change their wallpapers and even change their themes to feel a beauty in their PC. So in today's article, we will be bringing to you this short tutorial on how you can change your PC font.
This with some very simple steps. You don't have to settle with the default system font on Windows 10. You can change it to anything you want—here's how.
Windows 7 and 10 change system font
It's quite easy to change your font style on PC, but you must modify your registry by storing the new font style in your registry before you can see your new font style.
In older versions like Windows 7, the Control Panel included personalization settings to change the system font for many visual elements on the desktop, such as File Explorer, icons, title bars, menus, message boxes, and more.
However, these fonts provided are very few and less attractive, and they might not please many. So in this article we will show you a simple method with many more updated system fonts that you can enjoy on your PC.
For some reason, Windows 10 removed these settings, and you are now stuck with the default system font. And the system settings in Windows 7 are no longer available on Windows 10, and the default system fonts stick to your PC.
However, it is possible to change the "Segoe UI" default font on Windows 10, if that is something you want to do. Now, it just takes a few more steps using the registry.
In this Windows 10 guide, we will walk you through the steps to change the default system font for most desktop elements.
How to change default font on Windows 10
How to change default font on Windows 10
Warning: This is a friendly reminder that editing the Registry is risky and can cause irreversible damage to your installation if you don't do it correctly. It's recommended to make a full backup of your PC before proceeding. Alternatively, you can create a system restore point, which will also help you revert the changes.
To change the system font on Windows 10, use these steps:
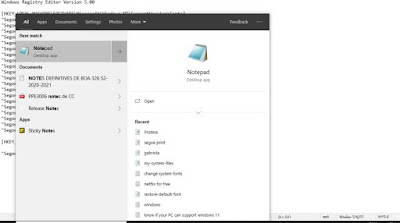
- Open the Start Menu.
- Search for Notepad and click the top result to open the text editor.

- Copy and paste the following registry code onto the file:
Windows Registry Editor Version 5.00

[HKEY_LOCAL_MACHINE\SOFTWARE\Microsoft\Windows NT\CurrentVersion\Fonts]
"Segoe UI (TrueType)"=""
"Segoe UI Bold (TrueType)"=""
"Segoe UI Bold Italic (TrueType)"=""
"Segoe UI Italic (TrueType)"=""
"Segoe UI Light (TrueType)"=""
"Segoe UI Semibold (TrueType)"=""
"Segoe UI Symbol (TrueType)"=""

[HKEY_LOCAL_MACHINE\SOFTWARE\Microsoft\Windows NT\CurrentVersion\FontSubstitutes]

"Segoe UI"="NEW-FONT-NAME"
Or you can download the file containing the above code using the link below:
- Open Settings.
- Click on Personalization.
- Click on Fonts.
- Select the font family you want to use.

- Windows 10 font settings
- Note the official name of the font family—for example, Century.
Windows 10 font settings
- In the Notepad text with the Registry code, replace "NEW-FONT-NAME" with the name of the font you want to use in the entire system—for example, Century.
Registry font settings
- Click the File menu.
- Select the Save as option.
- Use the "Save as type" drop-down menu and select the All Files option.
Notepad save as settings
- Confirm a descriptive name for the file, such as "system-font," and use the ".reg" as the extension. that is, if the name you choose is 'system-font', then you will register the name as "system-font.reg."
- Click the Save button.
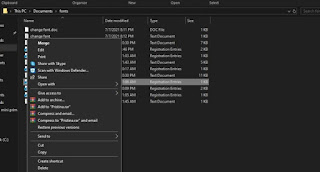
- Right-click the newly created ".reg" file and select the Merge option.

Windows 10 change default font with registry file
- Click the Yes button.
- Click the OK button.
- Restart the computer.
Once you complete the steps, the new font should be available throughout the desktop visual elements, including File Explorer, the message box, the taskbar, and apps that use the system default font settings. But note that you must restart your PC to enjoy the new font you just installed in your registry.
Although you can select from a lot of different fonts, it is recommended to choose a style that is easy to understand since fonts like Webdings or Wingdings use symbols, and they can cause issues to the installation.
How to change default font on Windows 7
To change the system settings on Windows 7 using this procedure, all you will need is the name of the specified font style you will like.
So after you find a name for the specified font you will love, you will just have to follow the procedure given above in detail and make sure you restart your PC to install your new font.
How to restore default system font on Windows 10
If you change your mind, you can always restore the previous settings using the registry or using a restore point. The process to change back to your default font is very similar to that we gave above.
Undo settings with Registry
To restore the default font settings on Windows 10, use the following steps:
- Open Start.
- Search for Notepad and click the top result to open the text editor.
- Copy and paste the following registry code onto the file:
Windows Registry Editor Version 5.00
[HKEY_LOCAL_MACHINE\SOFTWARE\Microsoft\Windows NT\CurrentVersion\Fonts]
"Segoe UI (TrueType)"="segoeui.ttf"
"Segoe UI Black (TrueType)"="seguibl.ttf"
"Segoe UI Black Italic (TrueType)"="seguibli.ttf"
"Segoe UI Bold (TrueType)"="segoeuib.ttf"
"Segoe UI Bold Italic (TrueType)"="segoeuiz.ttf"
"Segoe UI Emoji (TrueType)"="seguiemj.ttf"
"Segoe UI Historic (TrueType)"="seguihis.ttf"
"Segoe UI Italic (TrueType)"="segoeuii.ttf"
"Segoe UI Light (TrueType)"="segoeuil.ttf"
"Segoe UI Light Italic (TrueType)"="seguili.ttf"
"Segoe UI Semibold (TrueType)"="seguisb.ttf"
"Segoe UI Semibold Italic (TrueType)"="seguisbi.ttf"
"Segoe UI Semilight (TrueType)"="segoeuisl.ttf"
"Segoe UI Semilight Italic (TrueType)"="seguisli.ttf"
"Segoe UI Symbol (TrueType)"="seguisym.ttf"
"Segoe MDL2 Assets (TrueType)"="segmdl2.ttf"
"Segoe Print (TrueType)"="segoepr.ttf"
"Segoe Print Bold (TrueType)"="segoeprb.ttf"
"Segoe Script (TrueType)"="segoesc.ttf"
"Segoe Script Bold (TrueType)"="segoescb.ttf"
[HKEY_LOCAL_MACHINE\SOFTWARE\Microsoft\Windows NT\CurrentVersion\FontSubstitutes]
"Segoe UI"=-Or download the file below containing the above code
- Click the File menu.
- Select the Save as option.
- Use the "Save as type" drop-down menu and select the All Files option.
- Save as a.reg file on Windows 10
- Confirm a descriptive name for the file, such as "default-font," and use the ".reg" as the extension—for example, "default-font.reg.".
- Click the Save button.
- Right-click the newly created ".reg" file and select the Merge option.
Windows 10 restores default font settings with Registry
- Click the Yes button.
- Click the OK button.
After you complete the steps, the Windows 10 default font should rollback to the previous configuration.
Change windows default font
Special Note: Take very great care in taking the following procedures. This is because this article has to deal with editing your PC's registry and your PC's registry as the name says contains every specific aspect of your PC and if there is any problem with your PC's registry, then your PC will misbehave and make sure to take the best PC font that won't affect your registry.
Join us on Telegram using the link below and receive more tutorials to facilitate your day-to-day life.
Final Thoughts on How to Change Windows 10 and 7 System Fonts
Many people love when they have a unique something. And changing system fonts is one of the few ways to make our system specially different from your friend's system.
And so, in this article, we showed you how you can change your Windows 7 and Windows 10 system fonts using the registry method.
Read it and share it with your friend, and let them know they can change their fonts and enjoy better handwriting on their screen however it pleases them.
Post a Comment